 Creating an Agent Tutorial
This tutorial walks you through creating an AI agent visually in RuleGo-Editor, configuring the LLM model and tools, testing it via conversation, and calling it through the OpenAI-compatible API.
# Prerequisites
RuleGo-Server must be compiled with the
with_aibuild tag to include AI-related components (theai/agentnode, LLM tools, etc.). Pre-built binaries from Github Releases (opens new window) already include these. If building from source:go build -tags "with_ai" -o server ./cmd/server/1See Installation and Deployment for details.
LLM connection information is configured in
config.conf:[global] llm_url = https://api.openai.com/v1 llm_api_key = sk-xxx llm_model = gpt-4o1
2
3
4Supports all LLM services compatible with the OpenAI API (DeepSeek, Qwen, Ollama, etc.). You can also configure the LLM directly in the agent node without using global variables.
RuleGo-Server is running and the editor is accessible at
http://localhost:9090/editor/
# Step 1: Create a Rule Chain
Open the editor and click the New button on the toolbar to create a new rule chain. A rule chain is an agent — every rule chain can serve as an independent agent.
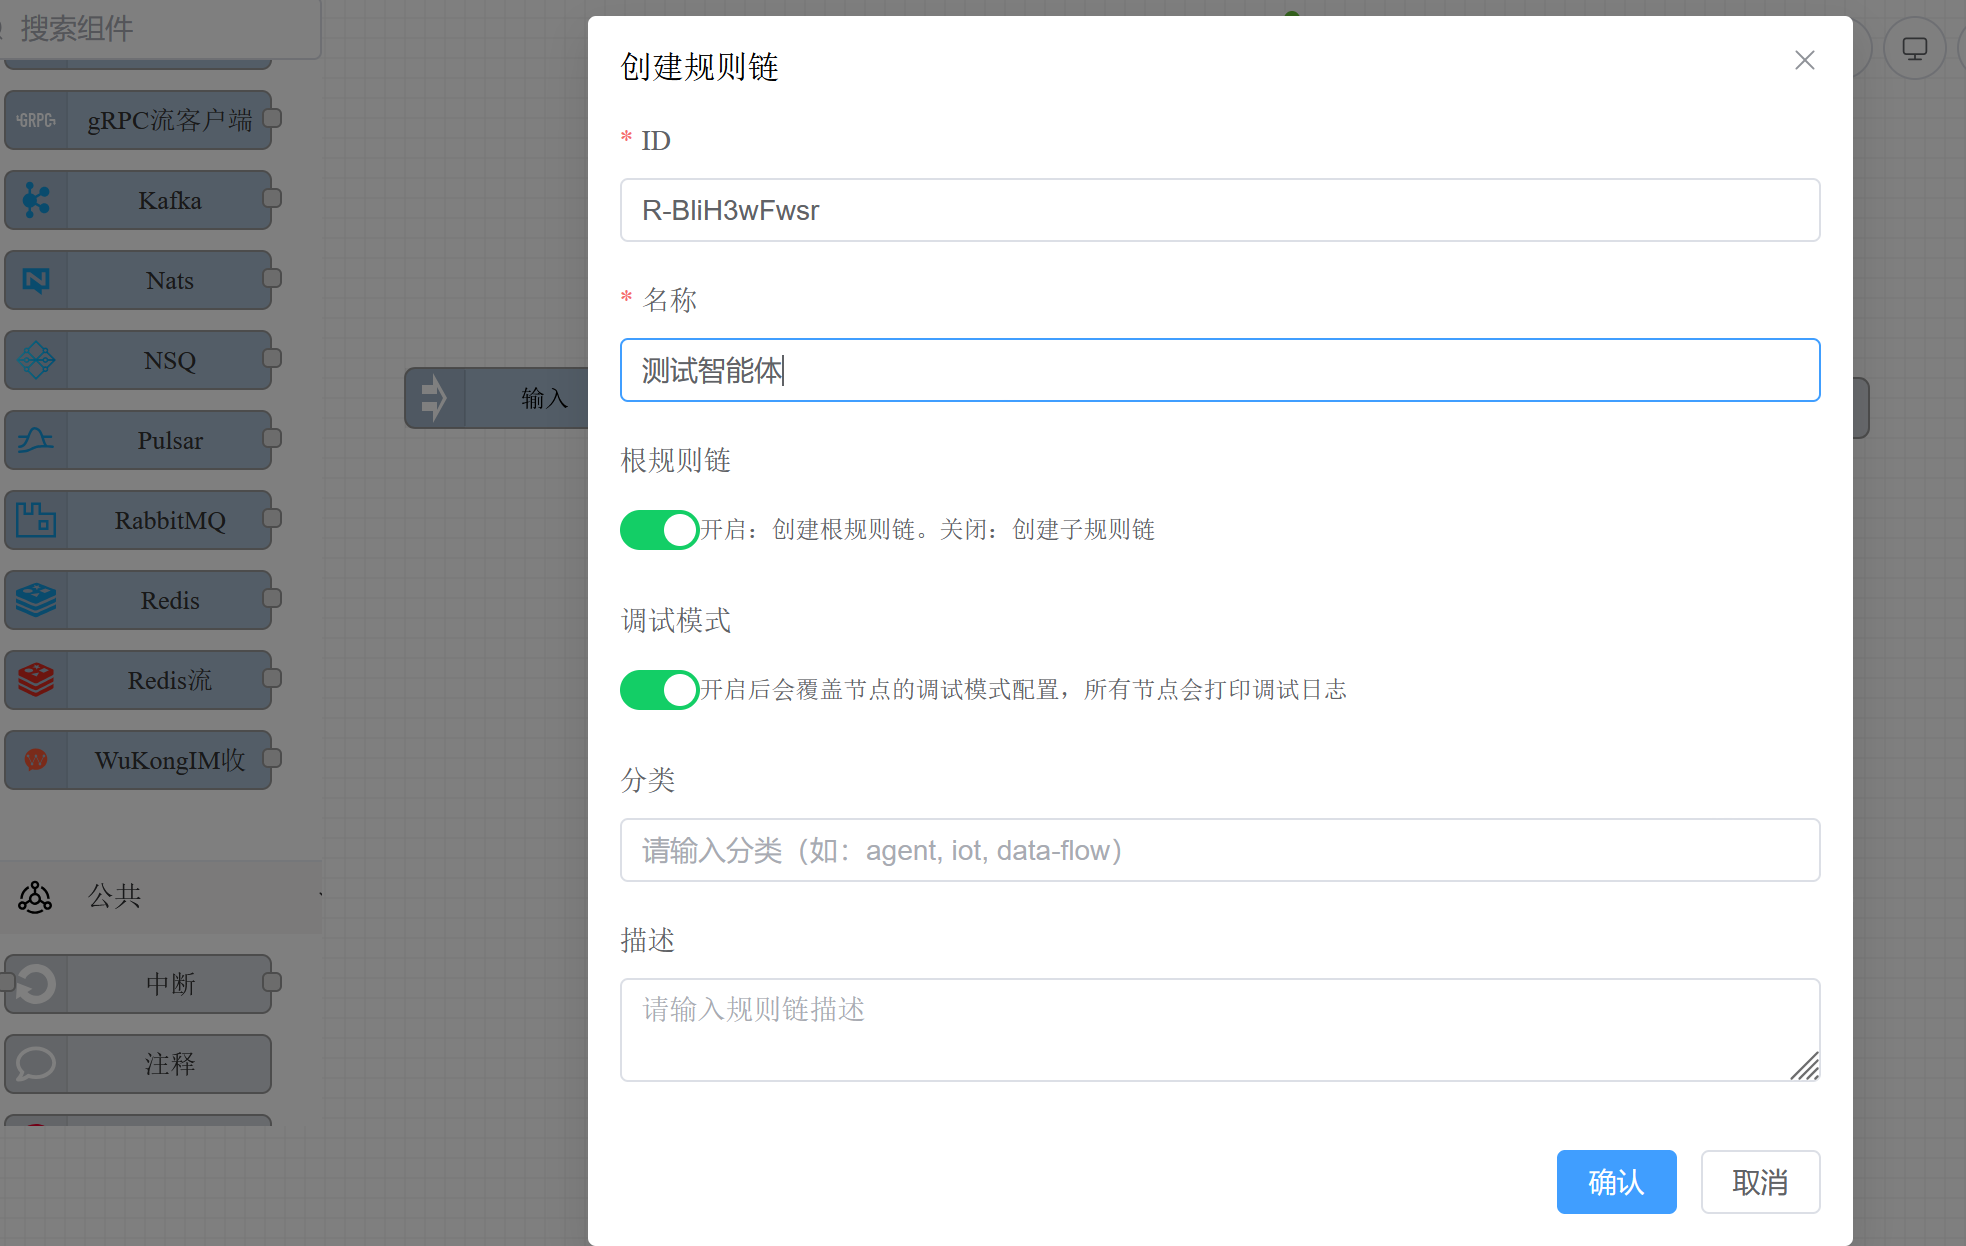
After creation, set the name and description in the rule chain info. A clear description is recommended, as it will be used to auto-generate the tool description when the agent is referenced as a sub-agent.
# Step 2: Add an Agent Node
From the AI Agent category in the left component panel, drag the Agent (ai/agent) component onto the canvas.
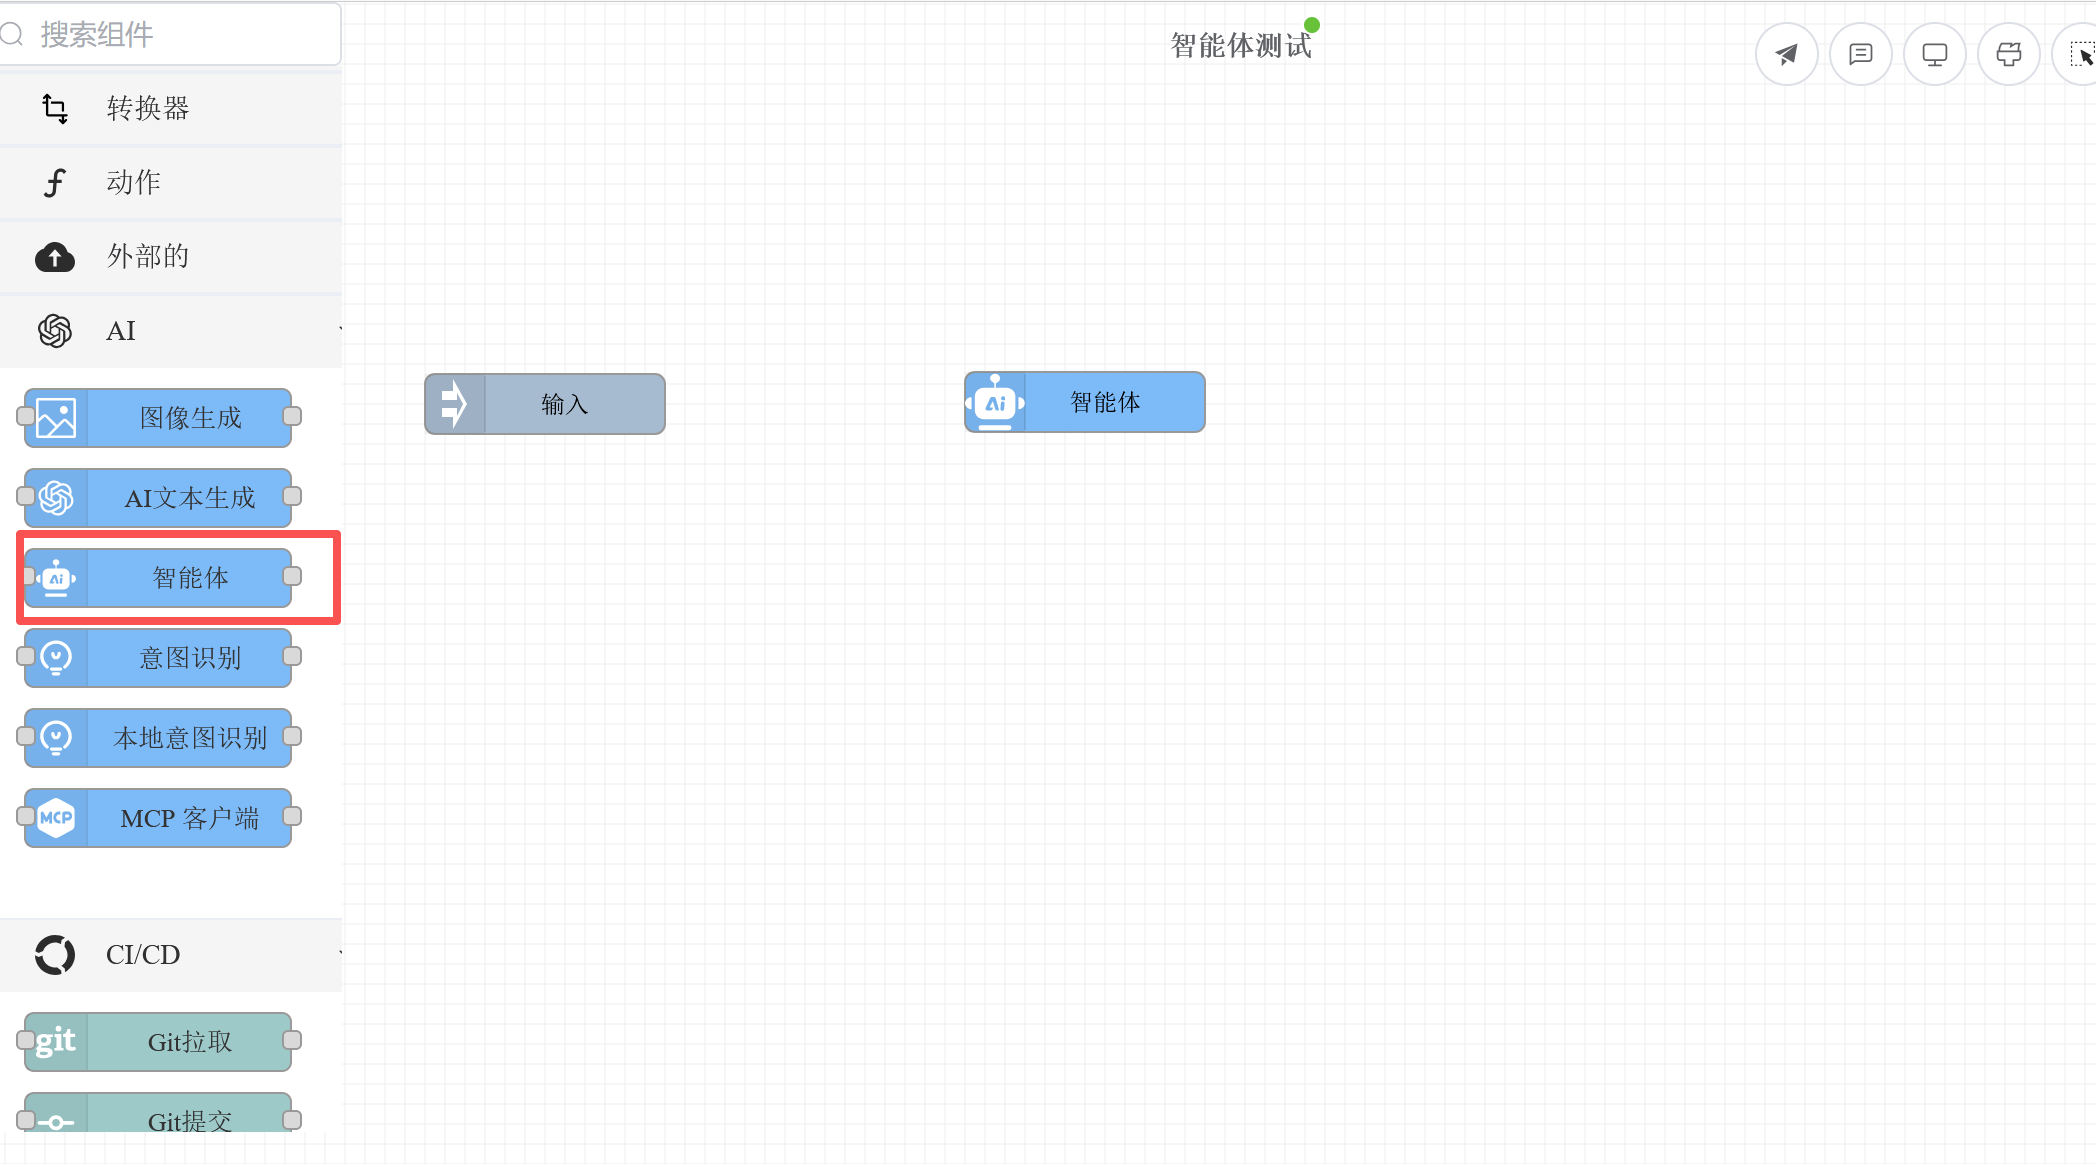
The
ai/agentnode is the core of the agent, responsible for the LLM reasoning and tool call loop. For the complete component configuration reference, see Agent Component.
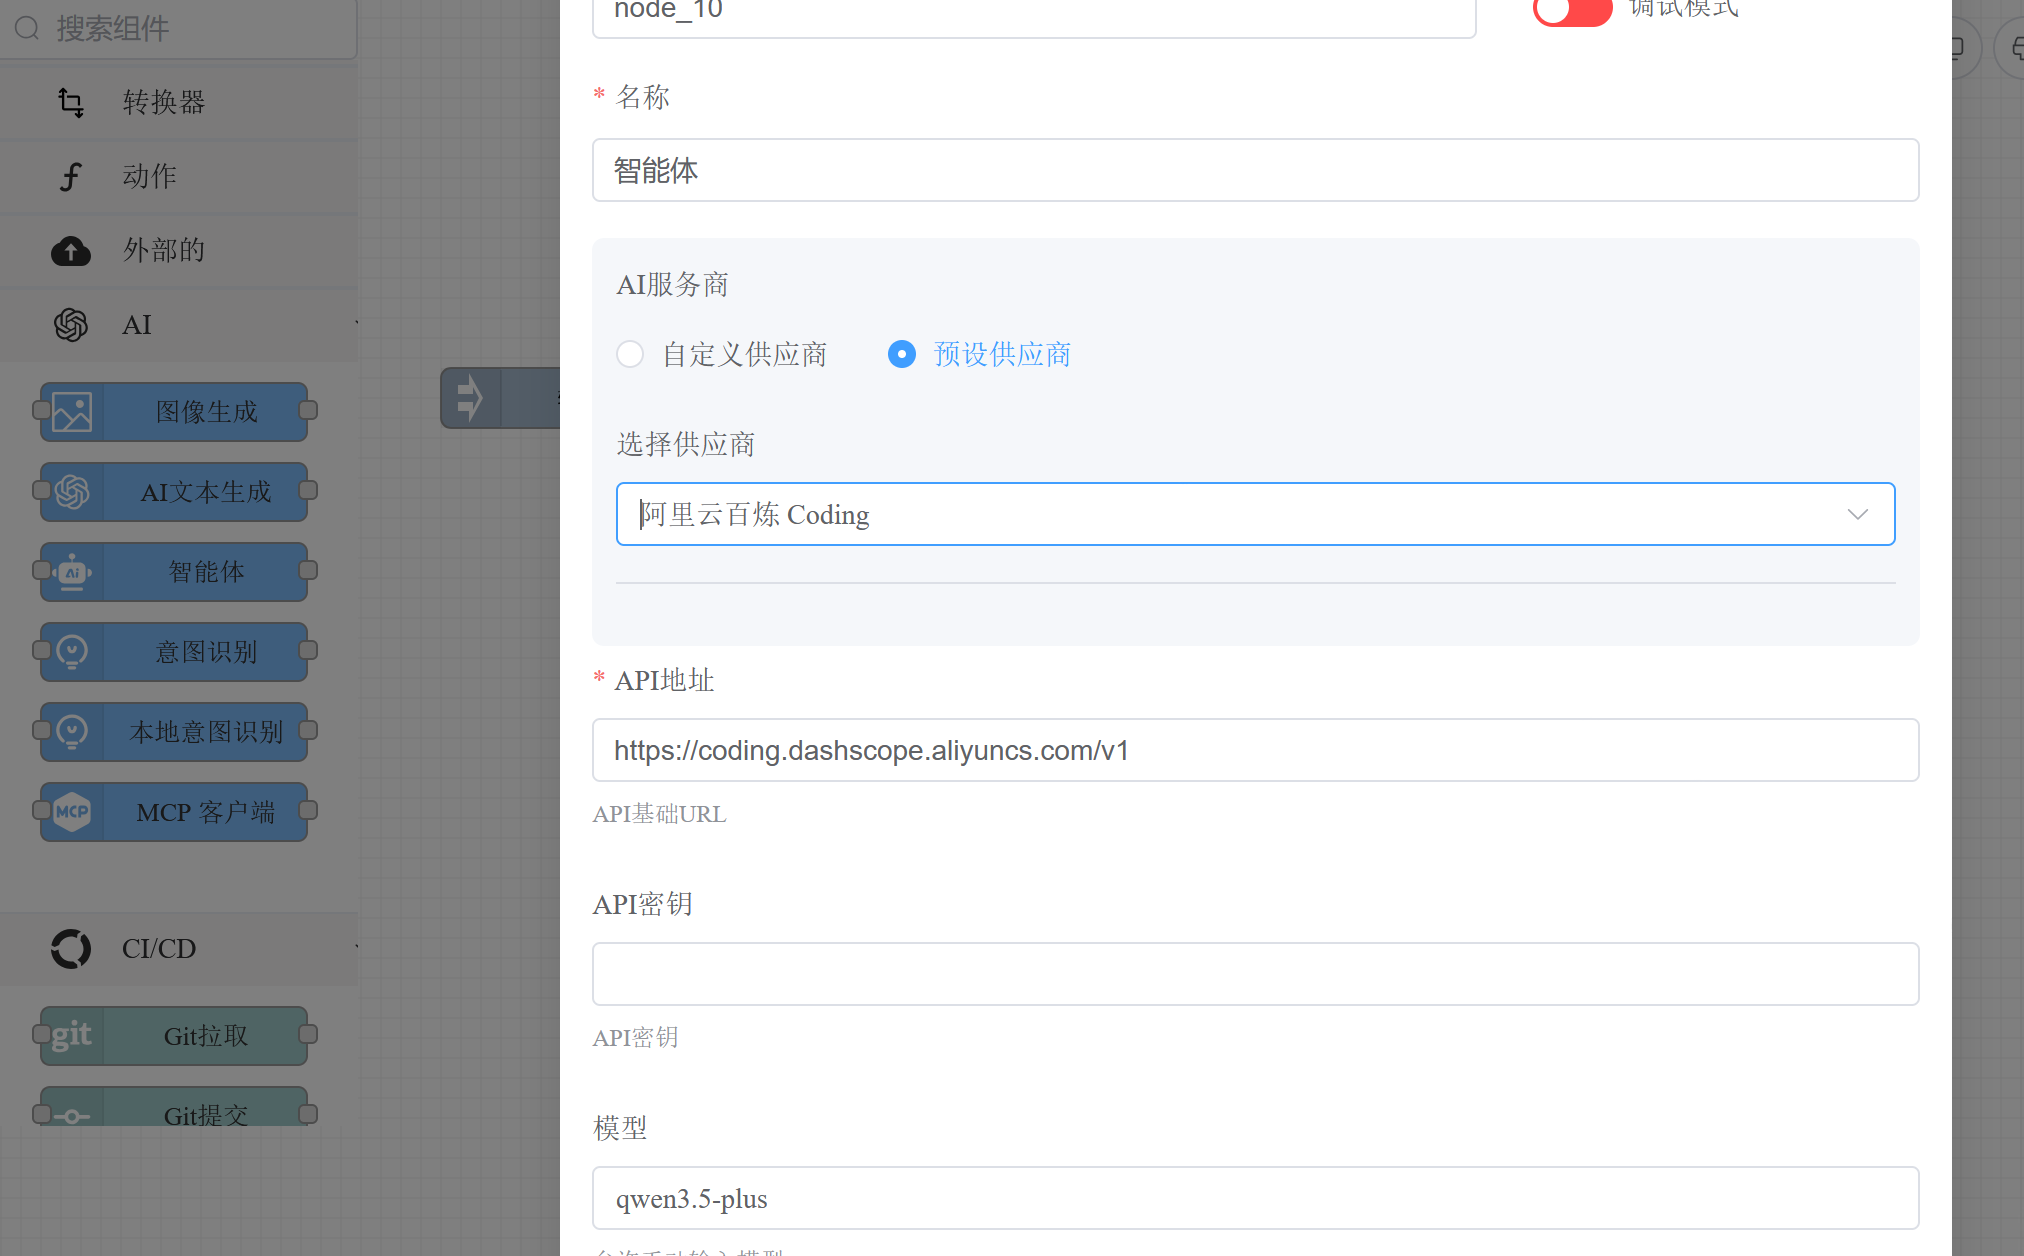
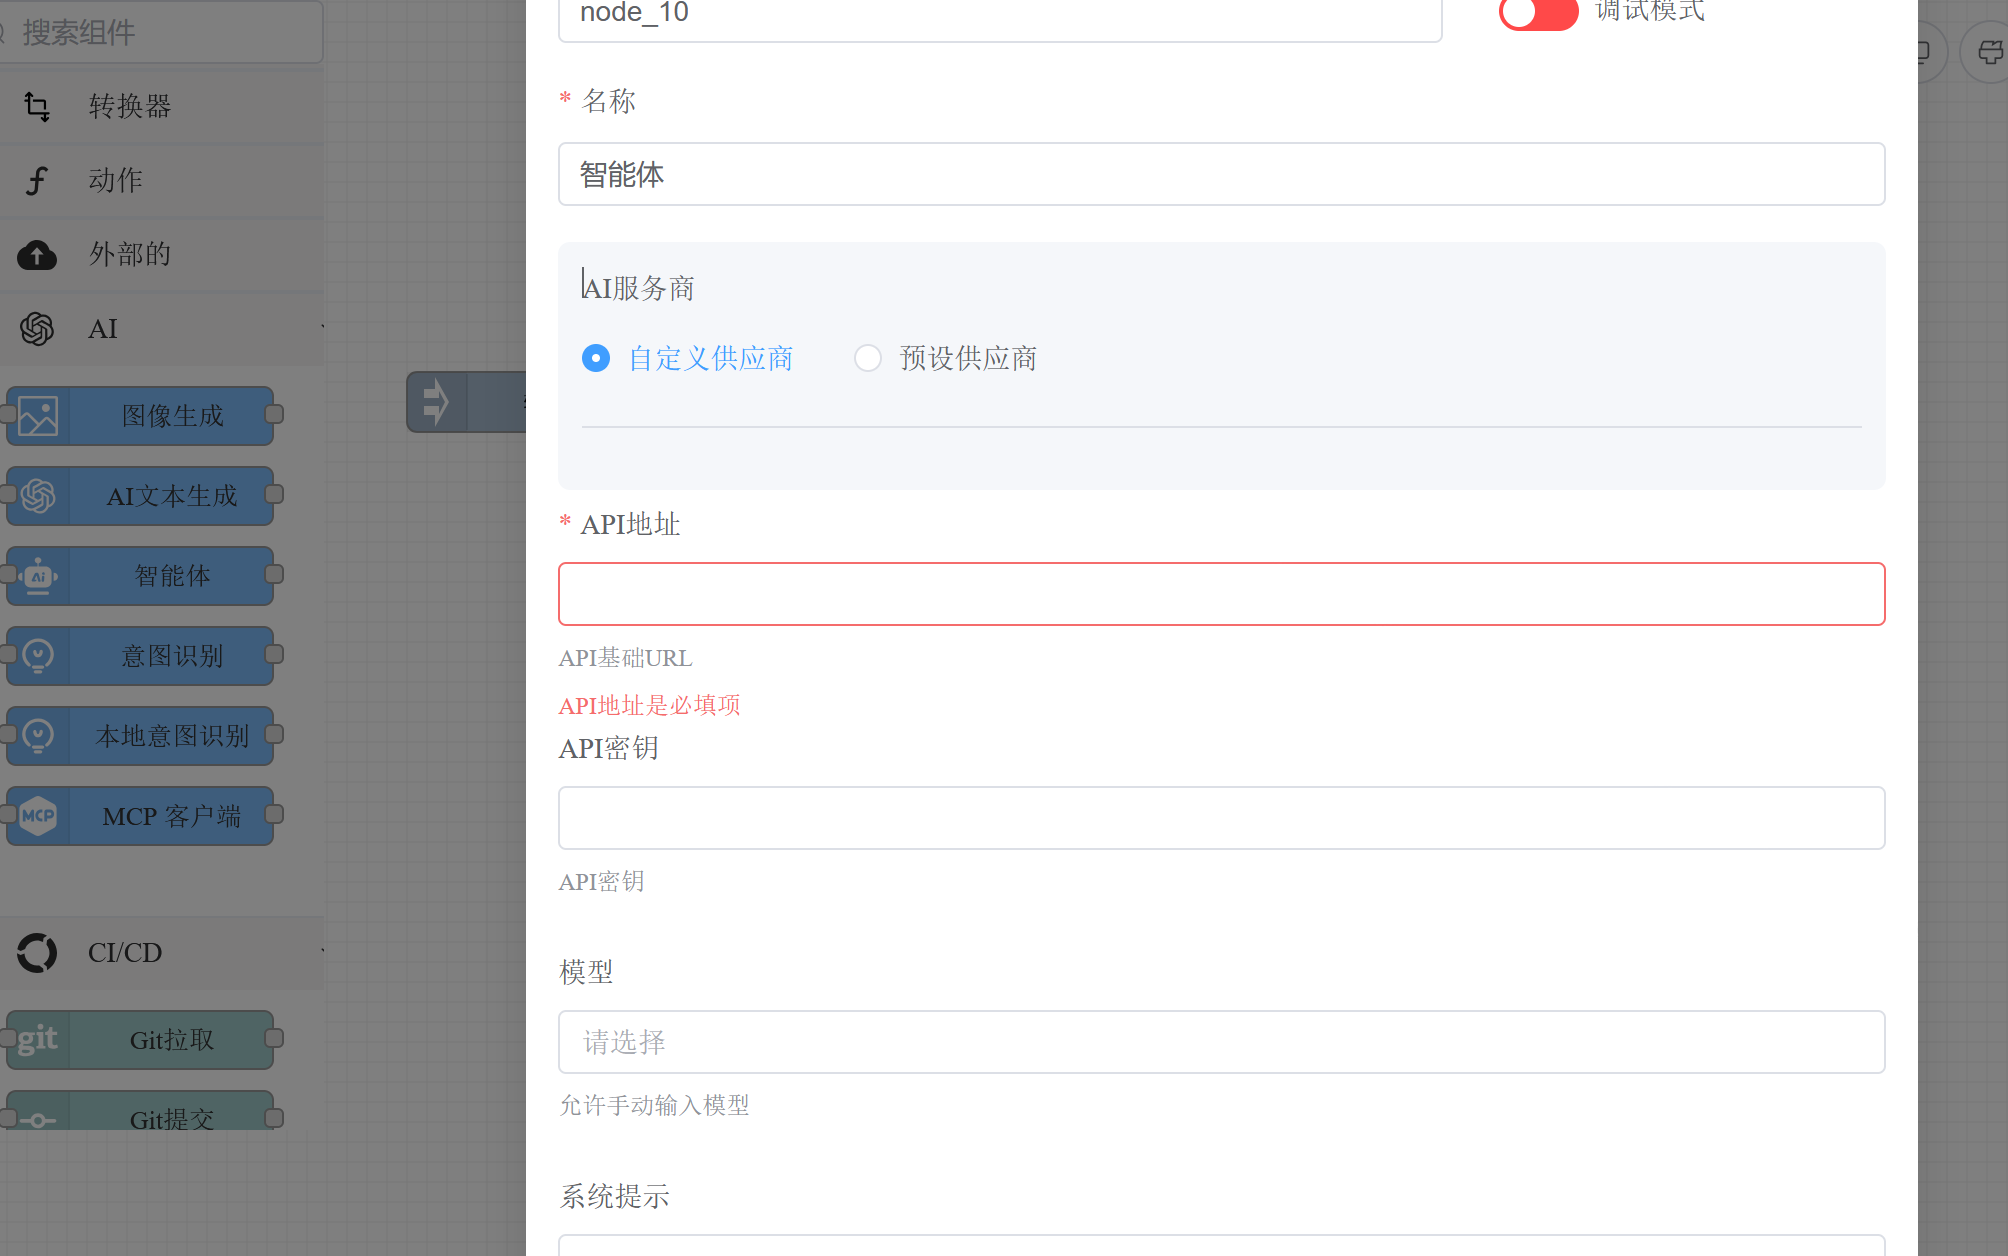
# Step 3: Configure the LLM Model
Double-click the agent node to open the property editor panel and configure the LLM connection information.
# Option A: Select a Preset Provider
Select an LLM provider from the dropdown list. The system will auto-fill the API address and available model list — just enter your API key.
# Option B: Custom Provider
If your LLM service is not in the preset list, switch to "Custom" mode and manually enter the API address, key, and model name. Supports all services compatible with the OpenAI API protocol (Ollama, vLLM, LocalAI, etc.).
You can also use global variables to reference configuration from config.conf:
API URL: ${global.llm_url}
API Key: ${global.llm_api_key}
Model: ${global.llm_model}
2
3
Model parameters (temperature, topP, maxTokens, etc.) can be adjusted in "Advanced Configuration".
# Step 4: Configure Tools (Optional)
Tools are capability units that the agent can call. In the agent node's property panel, find the "Tools" configuration area to add tools for the agent.
# Built-in Tools
The framework provides built-in tools such as bash (command execution), read (file reading), write (file writing), edit (file editing), and skill (skills). Check the tools you need and configure the working directory.

For detailed descriptions of built-in tools, see Tool System.
# Sub-agents or Sub-rule Chains
Reference other agents or rule chains as tools to enable multi-agent collaboration. Select the "agent" type tool and specify the target rule chain ID — the framework will auto-fill the tool name and description.
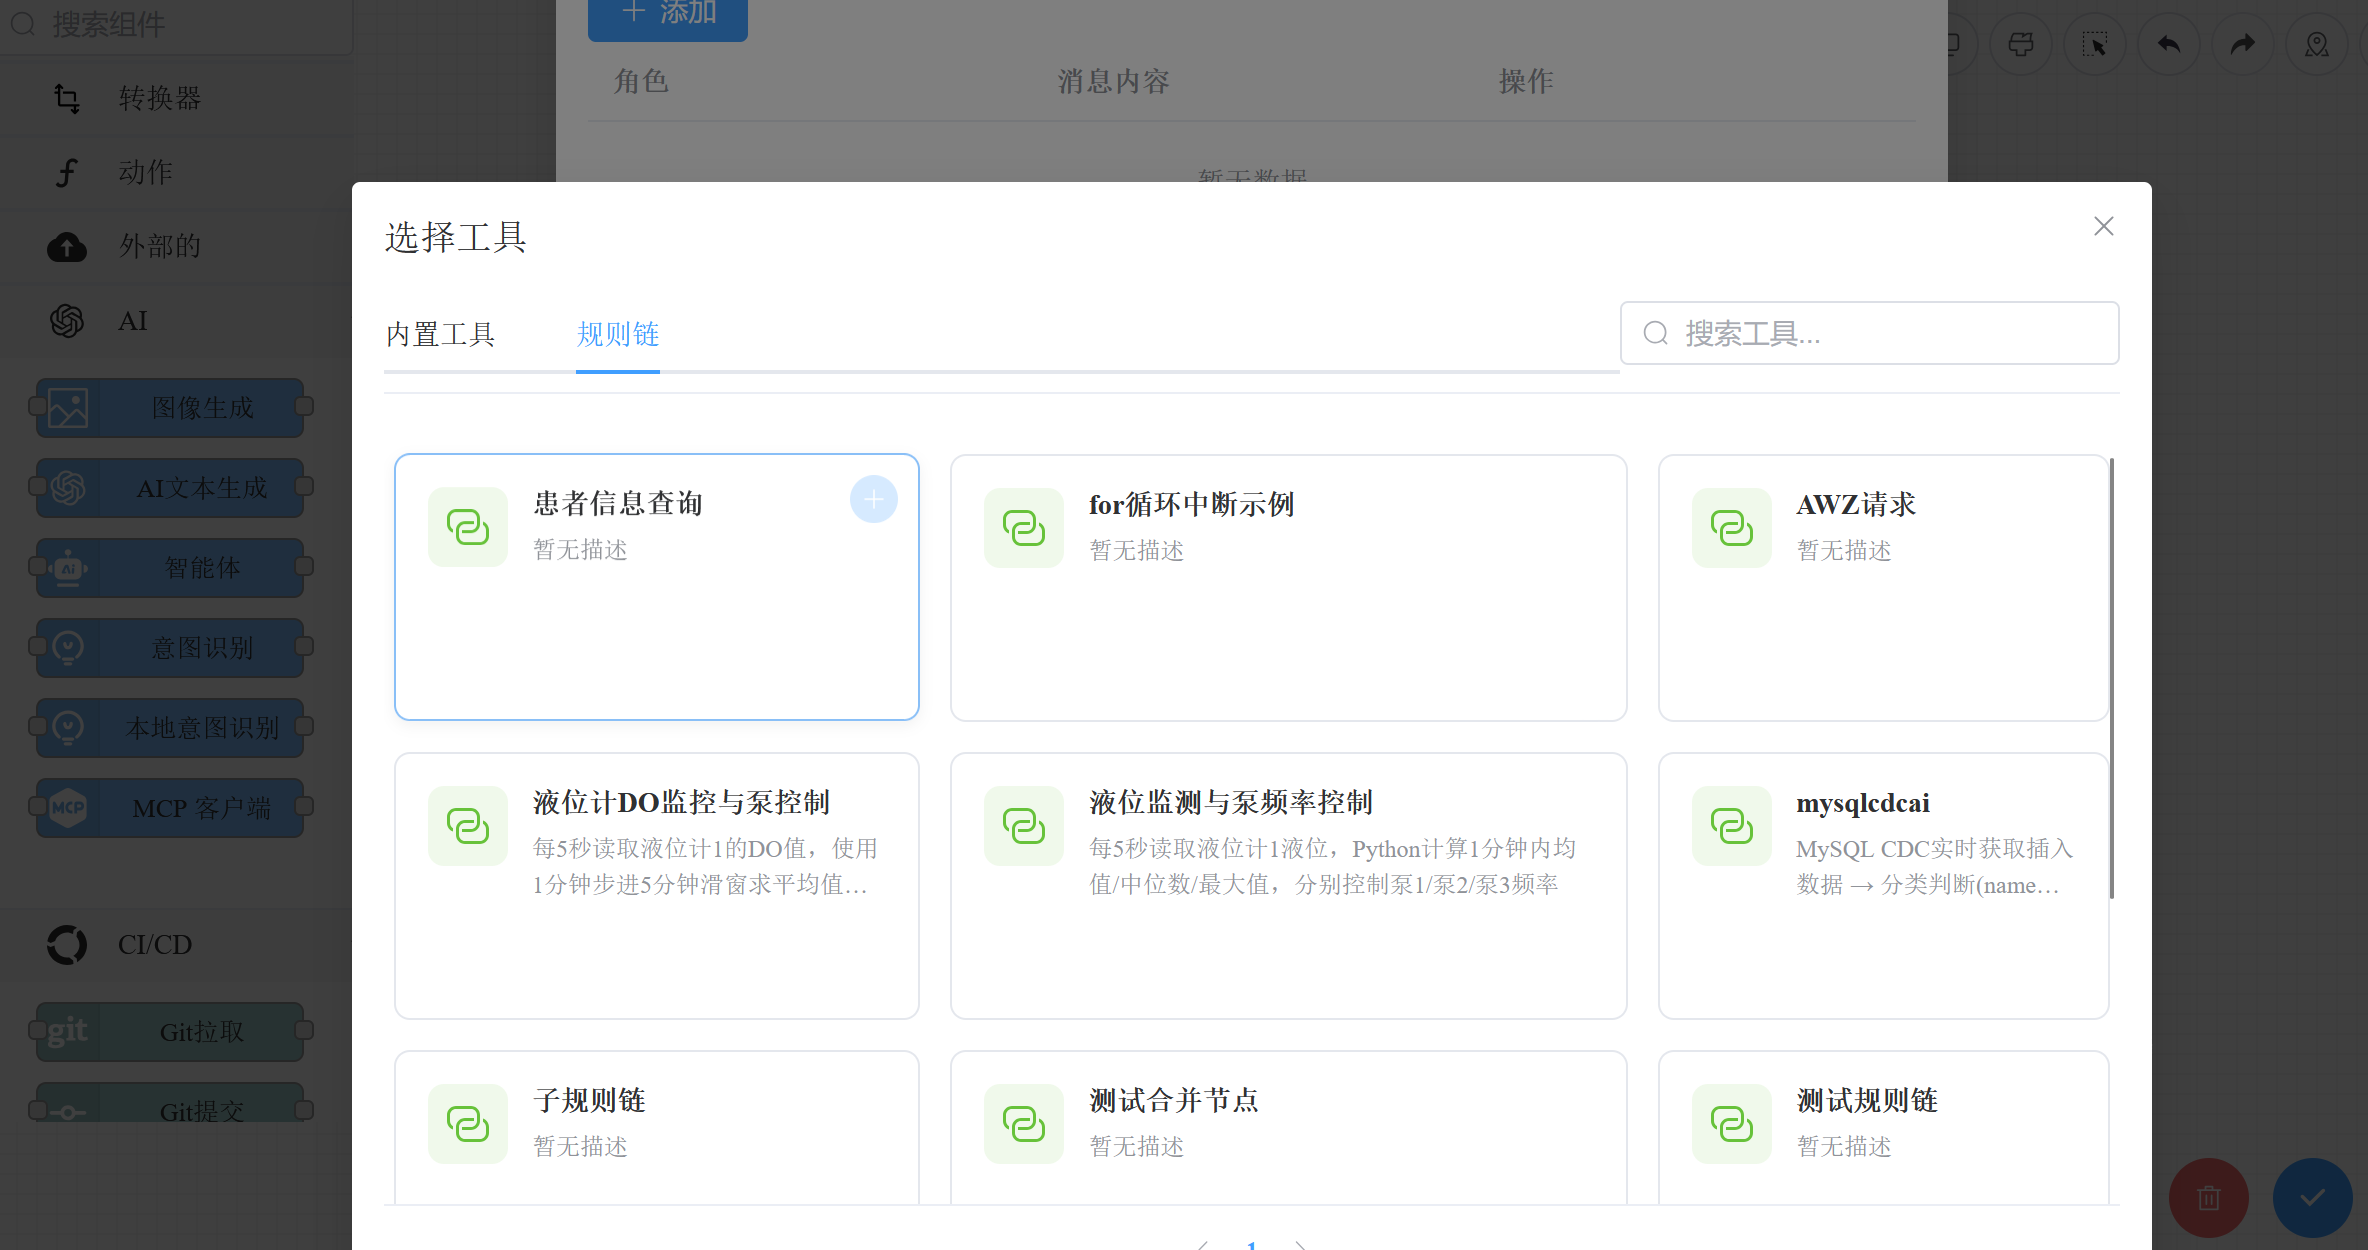
For more agent orchestration examples, see Orchestration Examples.
# Step 5: Configure End Node and Connections
Drag an End node (end) from the component panel, then draw a connection from the agent node to the end node.
- Success connection: Routes to the end node when the agent executes successfully
- Stream connection: Routes each chunk during streaming output (for real-time conversation)
- Failure connection: Routes on execution failure (can connect to an error handling node or end directly)
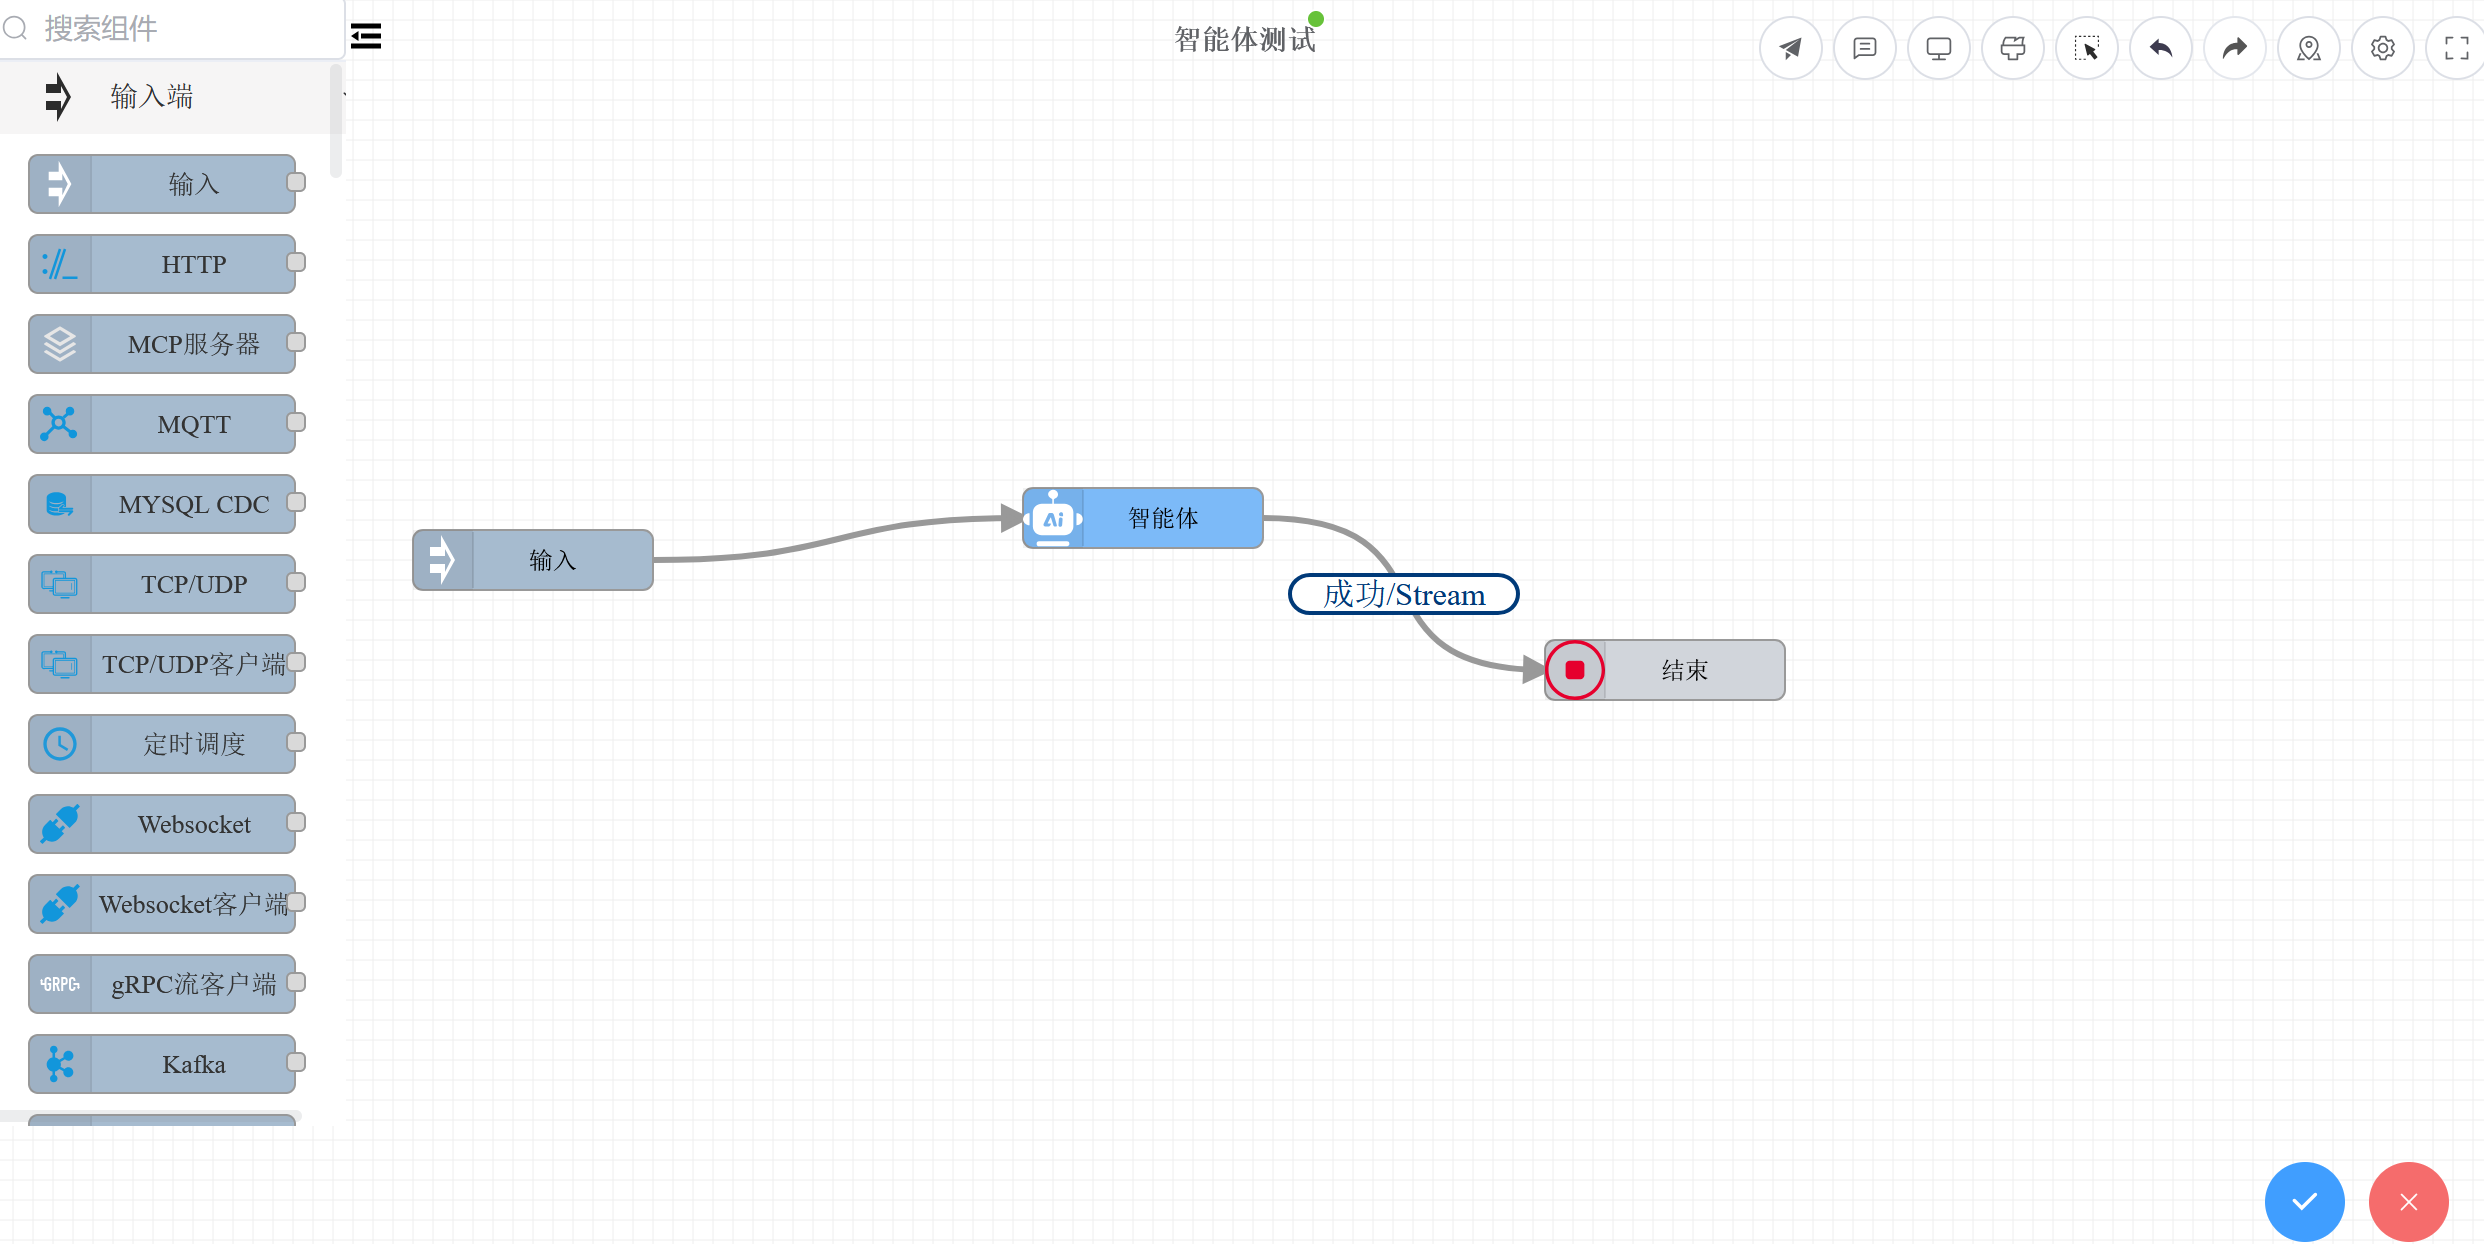
After configuration, click the Save button on the toolbar to save and deploy the rule chain.
# Step 6: Test the Agent
After saving the rule chain, an Agent Chat interface will appear at the bottom of the editor (automatically displayed when the rule chain category is AI Agent). Enter a message in the chat box to test the agent through conversation.
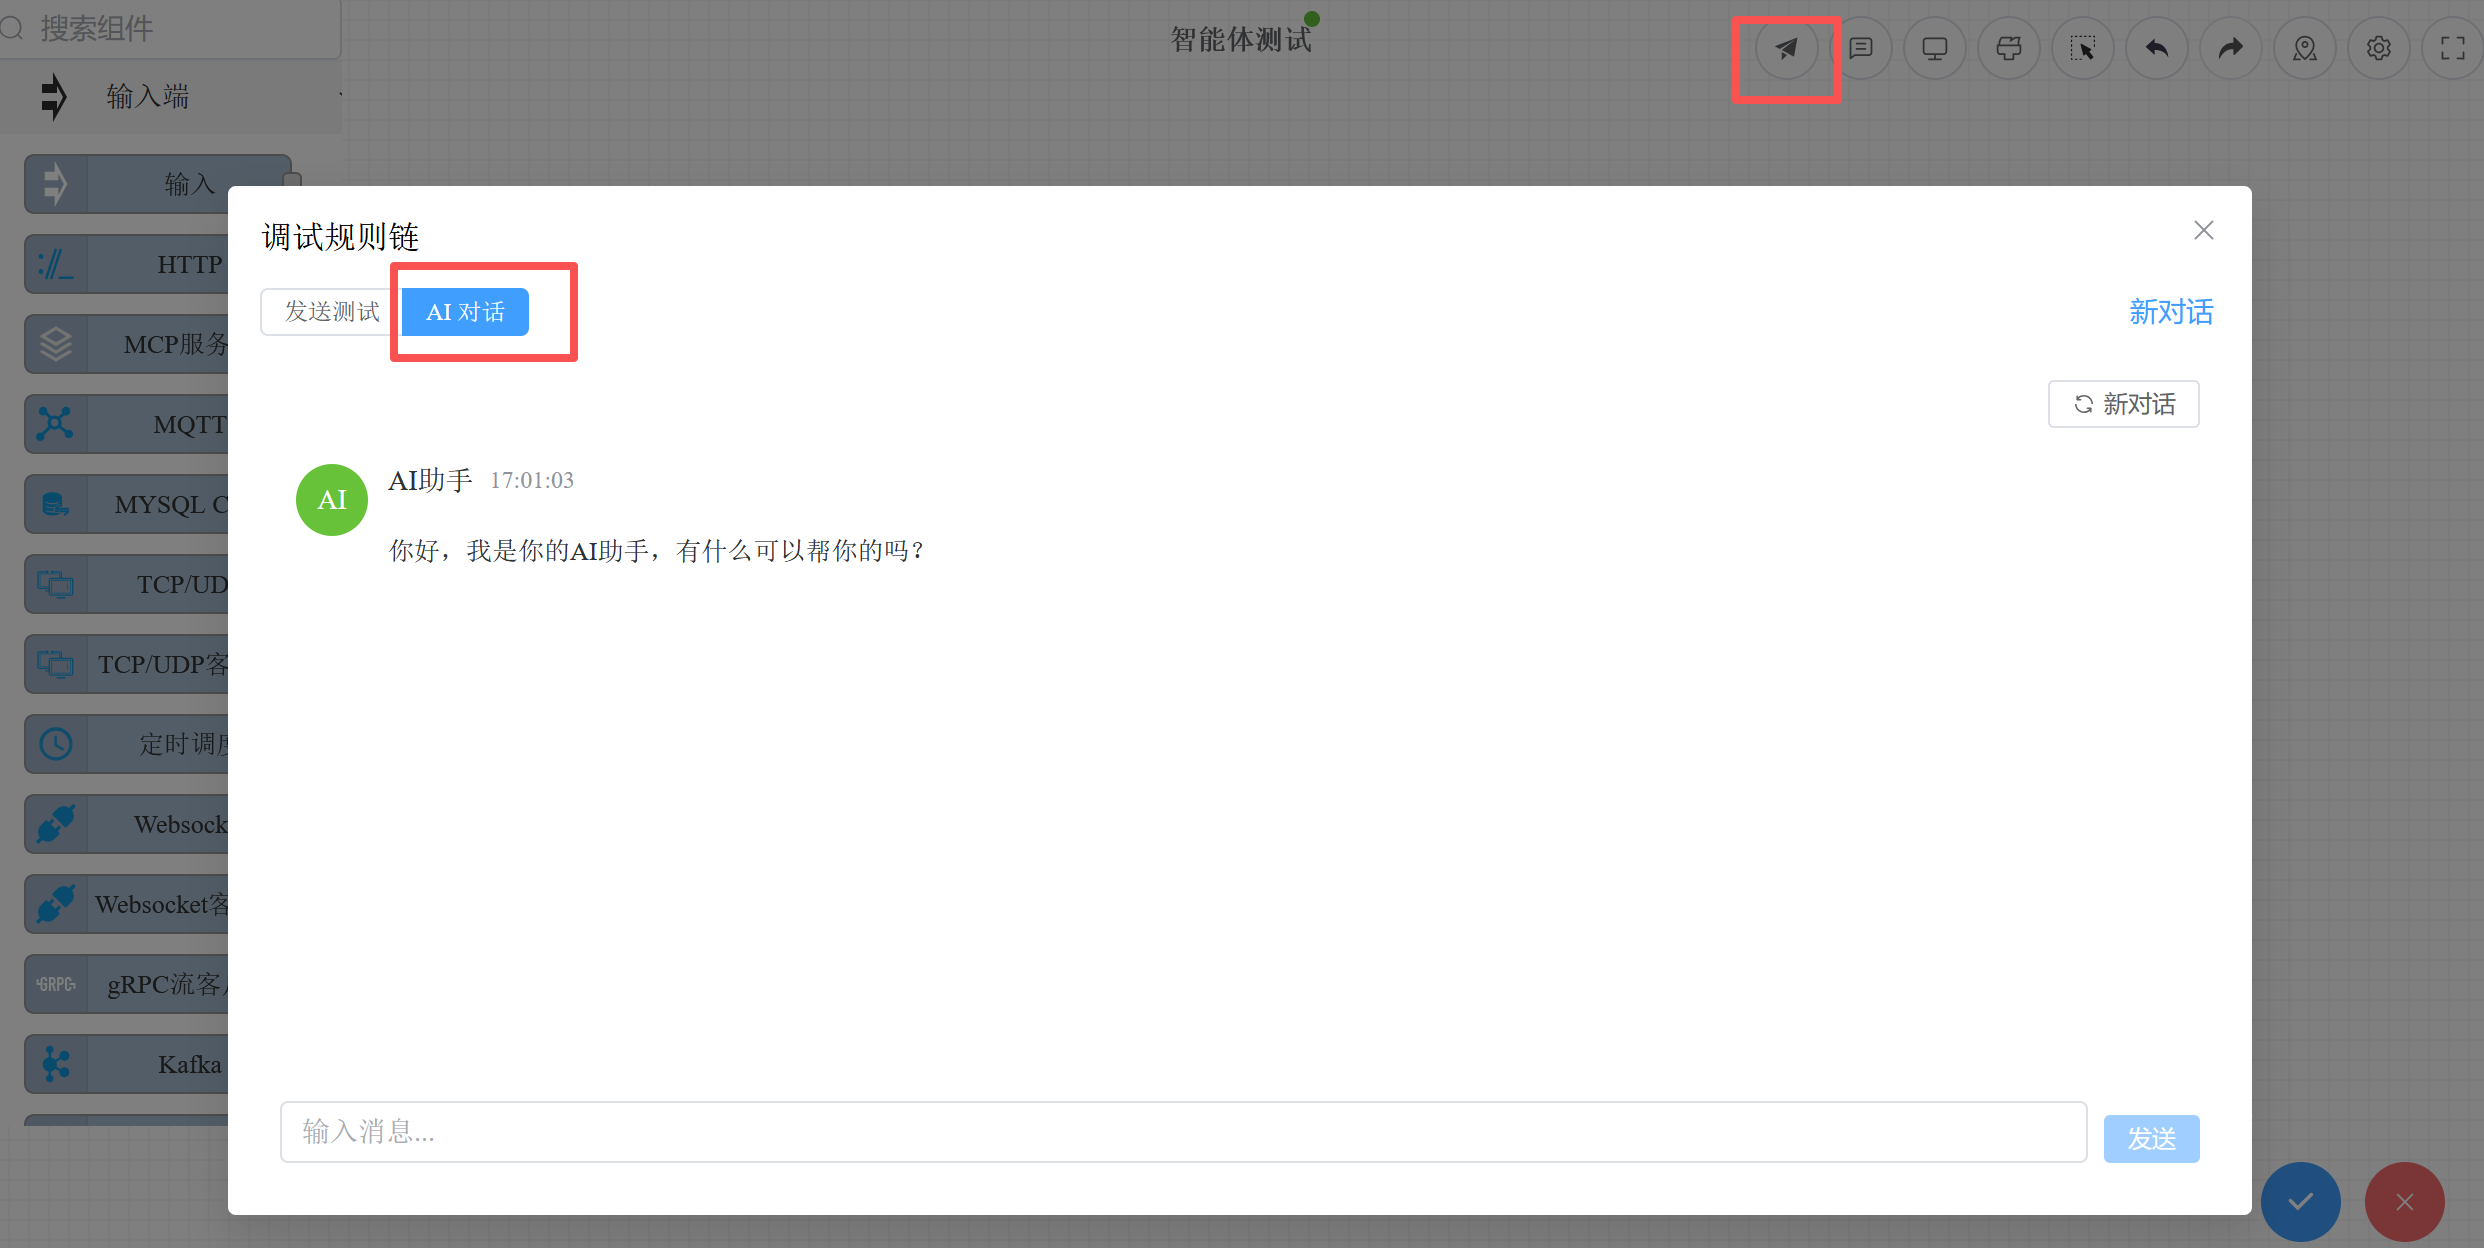
The chat interface supports:
- SSE streaming output with real-time display of the agent's responses
- Display of reasoning process and tool call details
- Independent progress indicator and execution results for each tool
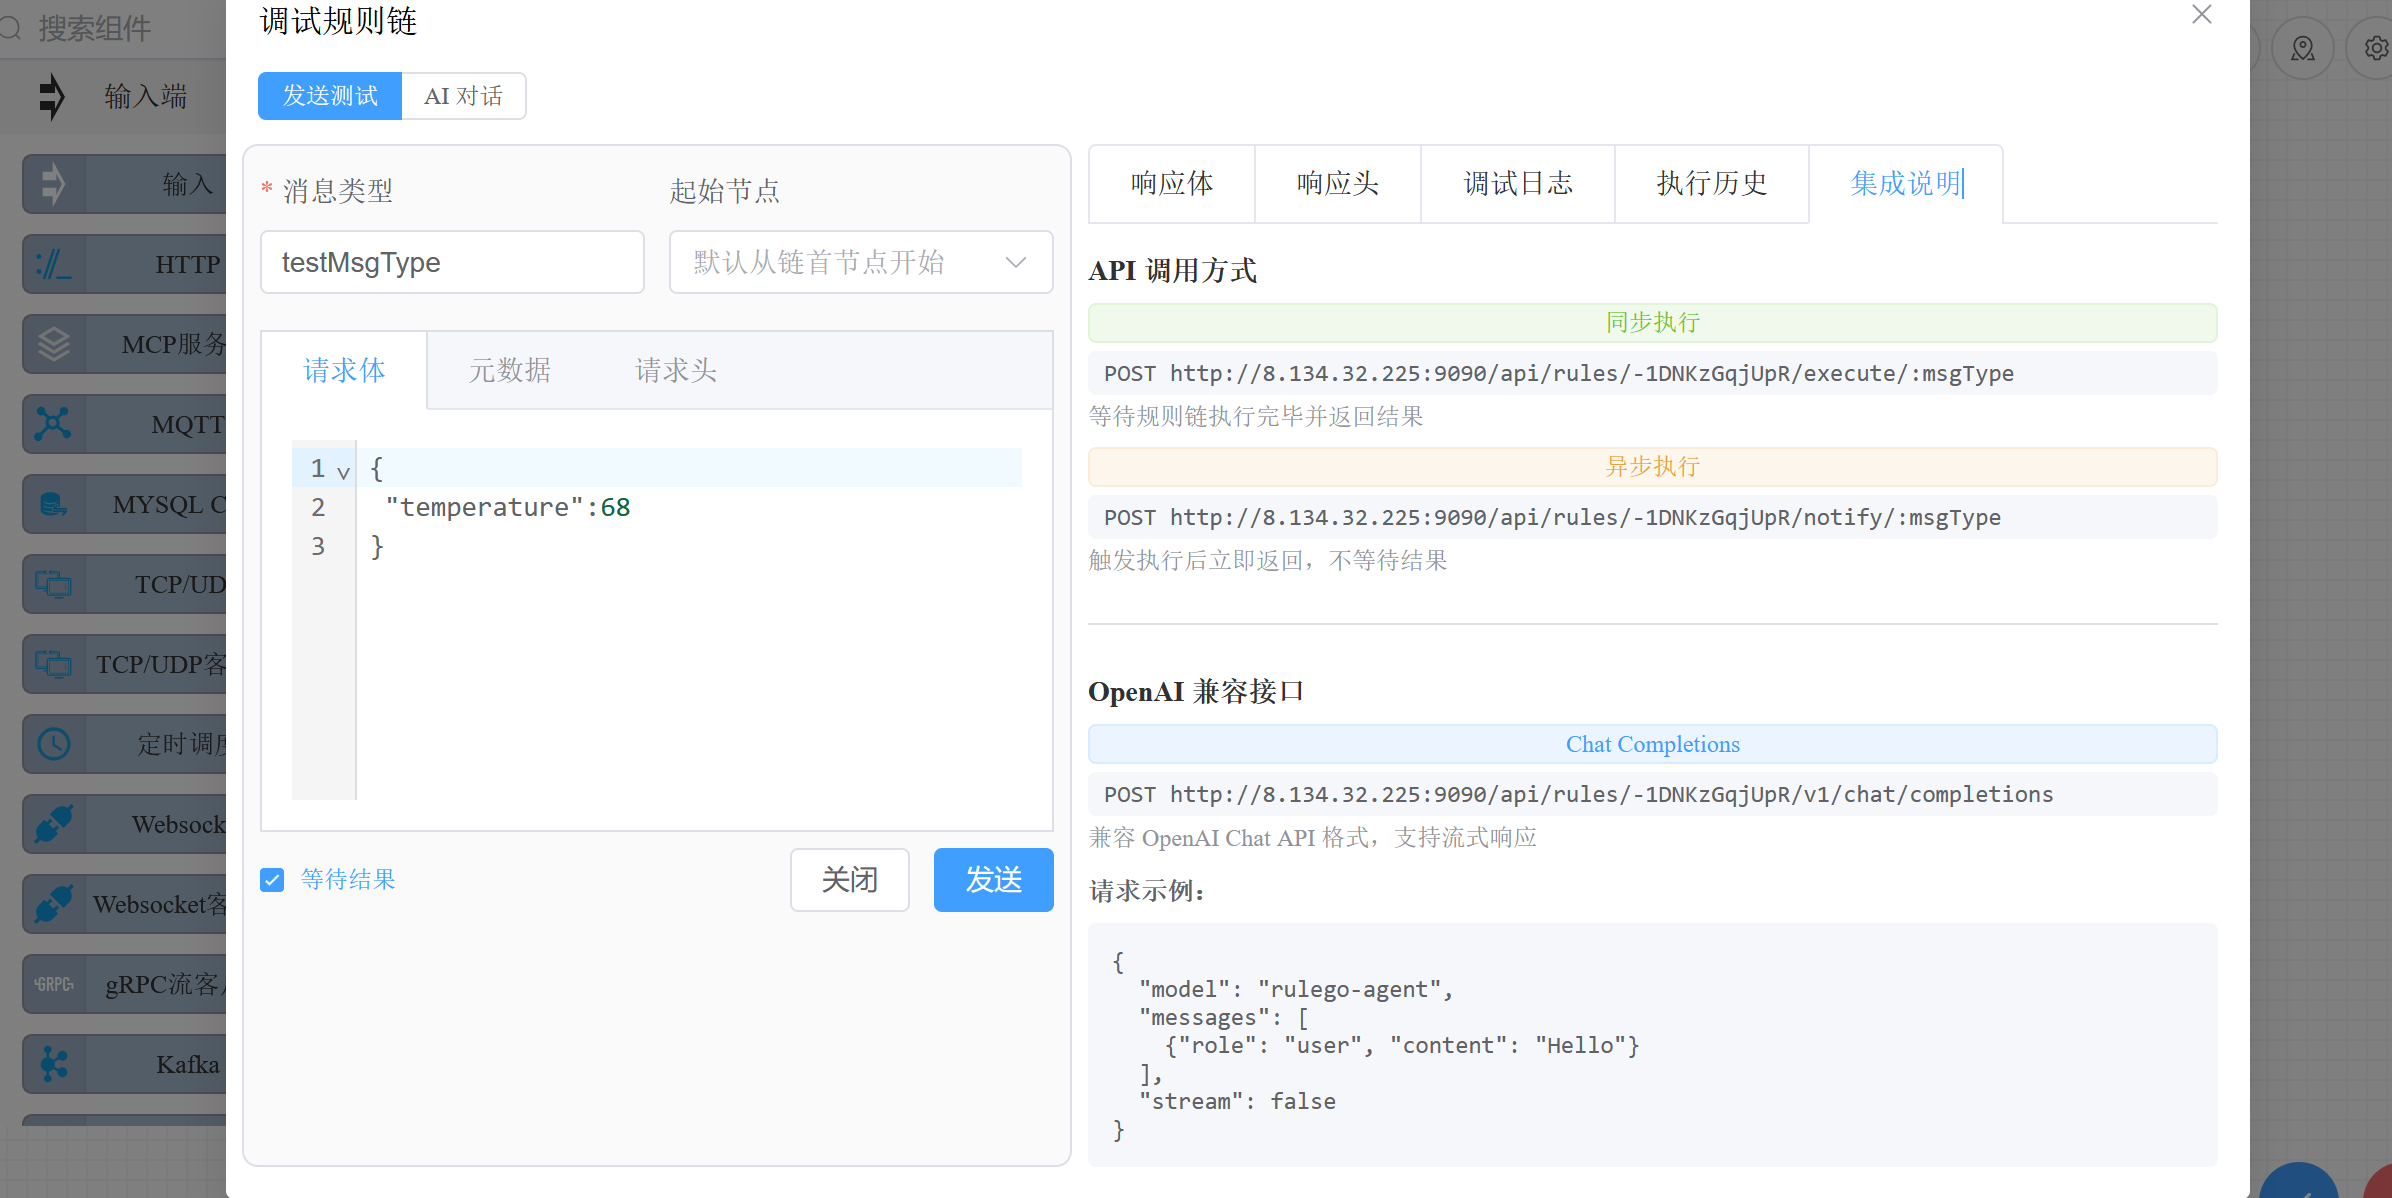
You can also test via the Run button on the toolbar, which executes the rule chain as a REST API call.
# Step 7: Call the Agent via API
Once deployed, the agent automatically gets an OpenAI-compatible API endpoint. It can be called by any client or SDK that supports the OpenAI protocol.
# Endpoint
POST /api/v1/rules/{ruleChainId}/v1/chat/completions
# Request Examples
Synchronous call:
curl -X POST http://localhost:9090/api/v1/rules/my-agent/v1/chat/completions \
  -H "Content-Type: application/json" \
  -H "Authorization: Bearer {apiKey}" \
  -d '{
    "messages": [
      {"role": "user", "content": "Hello, please introduce yourself"}
    ]
  }'
2
3
4
5
6
7
8
Streaming call (SSE):
curl -X POST http://localhost:9090/api/v1/rules/my-agent/v1/chat/completions \
  -H "Content-Type: application/json" \
  -H "Authorization: Bearer {apiKey}" \
  -d '{
    "stream": true,
    "messages": [
      {"role": "user", "content": "Hello, please introduce yourself"}
    ]
  }'
2
3
4
5
6
7
8
9
Multi-turn conversation:
curl -X POST http://localhost:9090/api/v1/rules/my-agent/v1/chat/completions \
  -H "Content-Type: application/json" \
  -H "Authorization: Bearer {apiKey}" \
  -d '{
    "stream": true,
    "messages": [
      {"role": "user", "content": "Check the current weather for me"},
      {"role": "assistant", "content": "Sure, let me check..."},
      {"role": "user", "content": "What about tomorrow?"}
    ]
  }'
2
3
4
5
6
7
8
9
10
11
# Using the OpenAI SDK
Since the endpoint is fully compatible with the OpenAI protocol, you can use the official SDKs directly:
Python:
from openai import OpenAI

client = OpenAI(
    base_url="http://localhost:9090/api/v1/rules/my-agent/v1",
    api_key="your-api-key"
)

response = client.chat.completions.create(
    model="agent",
    messages=[
        {"role": "user", "content": "Hello"}
    ],
    stream=True
)

for chunk in response:
    if chunk.choices[0].delta.content:
        print(chunk.choices[0].delta.content, end="")
2
3
4
5
6
7
8
9
10
11
12
13
14
15
16
17
18
Go:
import (
    "github.com/sashabaranov/go-openai"
)

config := openai.DefaultConfig("your-api-key")
config.BaseURL = "http://localhost:9090/api/v1/rules/my-agent/v1"
client := openai.NewClientWithConfig(config)

resp, _ := client.CreateChatCompletion(ctx, openai.ChatCompletionRequest{
    Model: "agent",
    Messages: []openai.ChatCompletionMessage{
        {Role: "user", Content: "Hello"},
    },
})
2
3
4
5
6
7
8
9
10
11
12
13
14
The
modelfield can be any value when calling a custom agent — the actual model used is determined by the agent node's internal configuration.
# Integrating with AI Programming Tools
Since it's compatible with the OpenAI protocol, the agent can be called directly by AI programming tools like Claude Code, Cursor, and Trae that support custom API endpoints. Fill in the tool's API configuration:
- API Base URL:
http://localhost:9090/api/v1/rules/{ruleChainId}/v1 - API Key: Your RuleGo-Server API Key
For more MCP protocol integration options, see MCP Service.
# Complete Configuration Reference
Below is a rule chain JSON for an agent with file operations and command execution capabilities:
{
  "ruleChain": {
    "id": "my-agent",
    "name": "Coding Assistant",
    "additionalInfo": {
      "description": "A coding assistant with file operations and command execution capabilities"
    }
  },
  "metadata": {
    "firstNodeIndex": 0,
    "nodes": [
      {
        "id": "node_agent",
        "type": "ai/agent",
        "name": "Agent",
        "configuration": {
          "url": "${global.llm_url}",
          "key": "${global.llm_api_key}",
          "model": "${global.llm_model}",
          "maxStep": 25,
          "systemPrompt": "You are a coding assistant that can read/write files and execute commands to help users.",
          "tools": [
            {"type": "builtin", "name": "bash", "config": {"workDir": "/data/workspace", "timeout": 60000}},
            {"type": "builtin", "name": "read", "config": {"workDir": "/data/workspace"}},
            {"type": "builtin", "name": "write", "config": {"workDir": "/data/workspace"}},
            {"type": "builtin", "name": "edit", "config": {"workDir": "/data/workspace"}}
          ]
        }
      },
      {
        "id": "node_end",
        "type": "end",
        "name": "End"
      }
    ],
    "connections": [
      {"fromId": "node_agent", "toId": "node_end", "type": "Success"},
      {"fromId": "node_agent", "toId": "node_end", "type": "Stream"},
      {"fromId": "node_agent", "toId": "node_end", "type": "Failure"}
    ]
  }
}
2
3
4
5
6
7
8
9
10
11
12
13
14
15
16
17
18
19
20
21
22
23
24
25
26
27
28
29
30
31
32
33
34
35
36
37
38
39
40
41
42
# Related Documentation
- AI Agent Framework Overview — Core concepts and architecture design
- Agent Component — Complete configuration reference for the
ai/agentnode - Tool System — Built-in tools, MCP tools, sub-agent tools
- Orchestration Examples — Agent and rule chain node combination examples
- AI Features — Built-in AI Agent and Skill management in RuleGo-Server
- AI Assistant Tutorial — Create and modify rule chains through conversation
- REST API Reference — Complete API documentation